How We Work

FAQS

When it comes to our line of work, questions are common, important, and warmly welcome. Start here. If you don’t find your answer, contact us at info@dcabinets.com.
Clean modern kitchen

UNDERSTANDING THE PROCESS

How exactly am I involved?
Expand icon

The beauty about how we work is that YOU steer the process. We need you – or your design professional – to come to us with a finished kitchen design plan in hand, accurate measurements, and a guiding vision. We’re here to transform your vision into a reality, with our expert counsel ensuring the beautiful results you’re dreaming about.

How fast is your process?
Expand icon

Let’s reframe that question, since every step in our process exists for a reason. Instead, let’s talk about pace. Each client’s pace is as unique to them as their cabinet front designs. Are your measurements solid and accurate? Can you review, revise, and approve confirmation drawings in a timely manner? Is your vision set,or do you want to explore alternatives? These tend to be the most common timeline drivers.

Does your process include confirmation drawings?
Expand icon

Yes, we always send detailed confirmation drawings of each piece for your approval. We don’t proceed to production until you approve. If we go through rounds of comments and corrections, you’ll get drawings to review and approve upon each cycle. If you want elevation drawings too, please be sure to request those via email when you place your order.

What should we consider when installing our Dunsmuir Cabinets fronts?
Expand icon

Given the precise nature of our work, accuracy is everything for the boxes, fronts, and hardware. If you’re installing yourselves, we strongly recommend viewing the IKEA Website, www.ikeafans.com, and even YouTube for helpful advice.

You also need to make sure your installer has a print out of your confirmation drawings in their hands when installing the IKEA cabinet boxes. Any customization done to the dCabinets panels is reflected in the placement of the boxes and the puzzel will not fit if the boxes are not the correct locations.

Do you provide full kitchen design services?
Expand icon

No sorry, you need to come to us with a design made for IKEA cabinet boxes. We will however help you to make it yours by suggesting details that will give that custom feel.

Can I order panels of non-IKEA boxes?
Expand icon

Yes, you can. If you send us the exact sizes of each individual panel, we can make them for you.

CUSTOMIZING MY DESIGN

What does your typical corner detail look like?
Expand icon

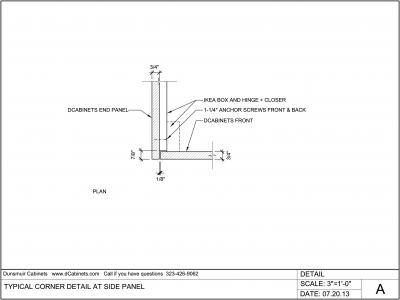
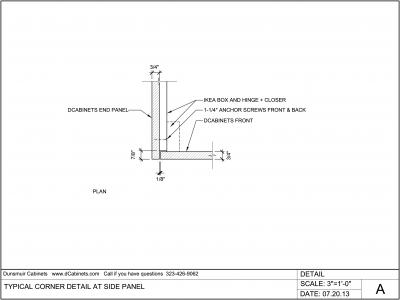
The end panel is flush with the cabinet front, with the front and hardware extending 7/8" in front of the cabinet box. See Drawing A for example.
Can I conceal my under-counter appliances behind base cabinet doors?
Expand icon

Yes, and you can do so without integrated fronts. Our recommended approach is:
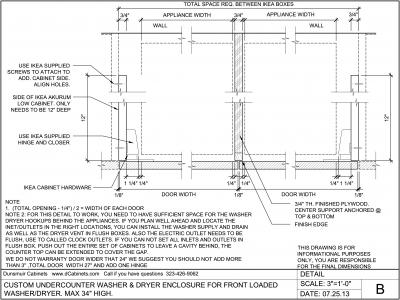
  • Select smaller European-style under-counter appliances.
  • Ensure ample space behind the appliance and wall for plumbing, electrical, and vent connections. This may be accomplished by leaving a gap behind the base cabinet boxes, by recessing utility connections into the finished wall, or a combination of both.
  • Given that most under-counter appliances are too wide for standard 24" fronts, you’ll need to attach both sides of a 24" IKEA base cabinet box – plumb and level, of course – to the adjacent cabinet boxes or to the finished wall surface. These panels will be used to secure the standard IKEA hinges that support the custom fronts.
  • Total space required between IKEA boxes is the sum of your appliance widths, plus the width of the hinges, the 3/4" center support, and a minimum of 1/4"on either side of the appliance.
  • When it comes to ensuring that the countertop won’t sag across multiple appliances, select finished ¾” plywood with a matching front-edge strip for both the substrate and for a vertical center support.
  • Make sure the substrate and counter NEVER rest directly on top of appliances. This avoids unwanted vibration and assists in appliance repair.
  • We do not recommend cabinet doorswider than 24”. Given their likelihood to sag, they are not warrantied.
Can I make my wall cabinets look like custom built-ins?
Expand icon

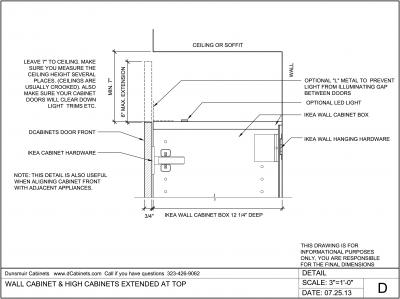
Yes, and you can avoid bulky soffits to get your desired appearance. Add up to 6” to the top of your doors in your measurements depending on ceiling height, while leaving ½” to ¾” between the cabinet door top and ceiling asclearance for lights and vents.

Can I add under-cabinet lights and finished bottom panels to my upper cabinets?
Expand icon

Absolutely, and we recommend everyone consider how lighting connects to how they live in the kitchen. Follow these steps:
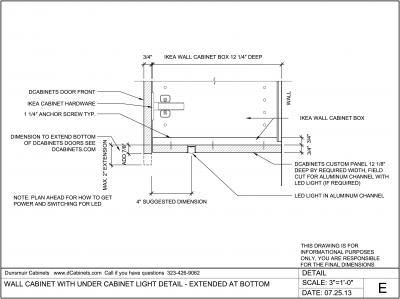
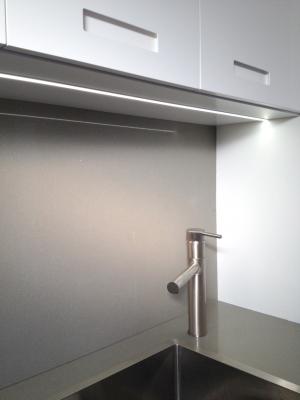
  1. Establish an electrical plan to locate your power supply and switches. Locate a duplex electrical outlet immediately above the wall cabinet on the back mounting wall and lead electrical power to this outlet from a remote wall switch adjacent to the countertop.
  2. Add to your order 1 (to be cut lengthwise) to 2 (size-specific) continuous matching panels for under the wall cabinets.
  3. Add between 7/8” to 2” to the bottom of your cabinet fronts’ measurements, to conceal your chosen LED strip light. (If you want a custom built-in look along the top of your cabinets – or if you want to add and conceal lighting to the top of the cabinet – add up to 6”, depending on your ceiling height, to your measurement.)
  4. Install IKEA wall cabinets with a minimum 3/4" space left between the finished wall and the outside edge of the wall cabinets. You can close this space with a custom matching panel, which you can add to your order.
  5. Install your chosen continuous LED strip light under the wall cabinet. The LED strip light will lead through an aluminum channel with diffuser (3/4" wide by 5/8" deep). Remember, where you place the LED strip light is meaningful.The further forward, the more it provides task lighting on the countertop. The further back, the more it illuminates the back wall and splash.
    • See diagram Details E for further information.
    • The light pictured is a 1/2" deep 5/8" wide flush mount alumunium channel with frosted cover and associated LED strip light and power supply.
Can I conceal lights along the top of my wall cabinets?
Expand icon

Yes indeed. Just add up to 6” to the measurement for the top of your doors, while leaving ½” to¾” between the cabinet door top and ceiling as clearance for lights and vents.
Can I install custom kicks for IKEA Sektion?
Expand icon

Yes, you can. IKEA SEKTION cabinets use integrated plastic clips to attach toe kicks. Dunsmuir Cabinet kicks come prepared to receive a "press-in" mounting clip. Note that these mounting clips are NOT included. We recommend purchasing aftermarket mounting clips such as Knock-on Plastic Plint Clip 5/32" thick by Titus or the screw on version on the Plith Clip.

MEASUREMENT

How do I measure for flush end panels?
Expand icon

Measure the distance from the wall surface to a point 7/8" in front of the IKEA cabinet box. If the wall surface is not smooth or plumb, subtract 1/8"from the width of the panel to create a small uneven reveal along the wall surface, or add 1/2" to the width and make a scribe cut to the wall. (Note: Only a skilled craftsman should make a scribe cut.). Then repeat for all subsequent end panels. See Detail A for dimensions. Note- Our Skinny Shaker panels are 7/8" deep and require a 1" distance,
What are the tolerances and clearances for your cabinet fronts?
Expand icon

Our doors allow a horizontal clearance of1/8" between cabinet doors, 1/16" between drawer fronts, and 1/8" between countertops and the top of base cabinet doors. Your kitchen design should allow a minimum clearance of 3/16" around built-in appliances (such as dishwashers, ovens, microwaves) and a minimum of 1/4"- 1/2" around inset refrigerators. Always consult your appliance manufacturer's specifications for precise clearance requirements. Also, keep in mind for your kitchen design plan that IKEA doors open wider than 90 degrees, and interior pull-outs can open past 150 degrees. Functional clearance should be top of mind. Feel free to contact us ify ou desire assistance navigating this question.

OTHER KITCHEN DESIGN QUESTIONS

How do I install a thin or ultra-thin countertop?
Expand icon

It’s a straightforward process. Simply:

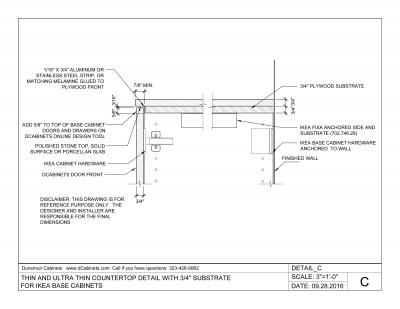
  • Assemble IKEA base cabinets and secure a finished 3/4" plywood substrate for the countertop. using IKEA Fixa anchor strips. Avoid plywood seams except on the countertop inside corners. Allow 1/8" between the front edge of the smooth plywood substrate and the front of IKEA box.
  • Use a professional adhesive to glue a continuous 3/4" x 1/16" aluminum or brushed stainless steel strip to the front of the plywood, flush with the IKEA box.
  • Glue the stone top to the substrate, leaving a minimum 7/8" lip.

Let us recommend that you integrate this kind of countertop into your kitchen design plan from the onset, since counter height changes proportions and elevations.
Do you offer floating shelves?
Expand icon

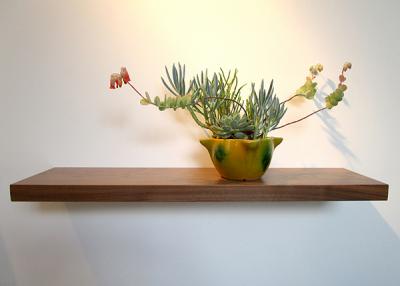
Yes, we offer floating shelves in many materials and colors. Floating shelves can be a great addition to your integrated kitchen design. Email us to get an estimate for these and other unique pieces.
FINISHES

What finish do you use for your lacquer cabinets?
Expand icon

We finish in conversion varnish, the industry standard for kitchen cabinets.

As special order and at about the double charge of our regular finish, we can provide panels finished in a premium paint finish called 2K Acrylic Polyurethane, an industrial-grade paint primarily used in aerospace and marine design due to its exceptional durability and resistance to moisture, head, abrasion, and stains. Please contact our office for a qoute in this finish.

Does the lacquer finish discolorover time?
Expand icon

The 2K Polyurethane finish is designed to resist discoloration or yellowing from UV light exposure and the effects of aging. However all materials, despite best intentions, do change some over time.

CARE & REPAIR

How can I prevent damage to my cabinet surfaces?
Expand icon

Follow these recommendations to maintain yourcabinet fronts’ beauty and longevity:

  • Minimize exposure to extremely high heat and steam from installed appliances, countertop appliances, and stove-top pans or kettles.
  • Keep candles and intense lighting fixtures away from finished surfaces.
  • Just like all natural wood, direct sun can cause fading, drying, and shrinking. Be aware of how such things as protracted afternoon sun or a kid’s taped artwork can change your cabinet door appearance over time.
  • Care for decorative metal hardware just as you would the cabinet fronts. Don’t use metal polish or other abrasives.
  • Be careful about hard objects striking the finished surfaces.
  • Water needs to be immediatly dryed off to not cause damage.
How should I clean my cabinet doors?
Expand icon

General cleaning should be done with warm water, mild liquid dish soap, and a soft drying cloth. For more stubborn stains, create a cleaning solution with warm water, vinegar, rubbing alcohol, and a few drops of dish soap. For tape glue, adhesives, or oil stains, preclean with a mild solvent like Goo Gone, vodka, or Castile soap before washing.

‍Some further tips to consider:

  • Dark color cabinet doors require regular cleaning to eliminate the build-up of oil stains and fingerprints. 
  • Very light colors show the accumulation of dust and require frequent gentle cleaning.  
  • Our clear-coated wood and painted cabinets have a 20% low sheen finish, which requires a gentle touch when cleaning.
  • Laminates are the easiest to keep clean as their surface is nonporous and highly stain and oil resistant.  Magic Eraser is a great way to remove problem spots from Fenix
Are there any products to avoid when cleaning my cabinet doors?
Expand icon

Yes. Avoid the following products:

  • Spic & Span
  • Tilex
  • Comet
  • Chlorine Bleach
  • Hand Washing Liquid
  • Glass Cleaner (e.g., Windex)
  • Ammonia
  • Furniture Polish / Pledge (and anything that can leave a wax coating)
How can I touch up the painted panels if they get damaged?
Expand icon
  • Did an abrasive create a shiny spot? If so, first clean the spot with alcohol. Once dry, lightly spray the appropriate Mohawk Perfect Blend Waterborne Lacquer, following its instructions. 
  • Do you have small nicks and dings? Consider calling a furniture repair expert. If you want to DIY-it, we recommend using a wax Mohawk fil-stick to fill, then use the appropriate Mohawk Perfect Blend Waterborne Lacquer.
Dunsmuir Cabinet Standard Colors
Matching Mohawk Fil-Stick
P1 Warm White
M231-9844
P2 Cool White
M231-8618
P3 Gray
M231-1476
P4 Greige
TBD
P5 Taupe
TBD
P6 Blue
M231-9853
P7 Dark Gray
M230-4029

If you have ordered a custom color, Wood Repair Products require a color-match chip to confirm the proper Fil-Stick.

SHIPPING & PICKUP

What are your shipping costs?
Expand icon

As you can imagine, it depends upon the exact nature of your order. We’re happy to provide a quote for shipping and insurance once the order is finalized. Please note that due to fluctuating fuel surcharges, the quote will have an expiration date.

Can I arrange for my own carrier?
Expand icon

Of course!

How are the items delivered?
Expand icon

Deliveries typically arrive in a large-skirted pallet, with curbside drop-off. All parts are individually wrapped in foam and labeled with an identification sticker, so you know where each piece goes in your design. The contents should be moved indoors and carefully stacked (lying flat, not stood on end) in a dry, secure location. Smaller packages are sent via FedEx.

Do you ship to Canada?
Expand icon

Yes! Please contact us for a customized quote.

Can I pick up my items directly?
Expand icon

We produce with a variety of manufacturers based on their specialty to get the best product. Currently we produce in Washington state, in the Los Angeles area as well as in Ontario, Canada. Please contact us to discuss if interested.